方法一
安裝 NordVPN 應用程式
$sh <(curl -sSf https://downloads.nordcdn.com/apps/linux/install.sh)沒有 curl 可以安裝 $ sudo apt install curl
NordVPN 指令集
nordvpn login - Log in.
nordvpn connect or nordvpn c - Connect to VPN. To connect to specific servers, use nordvpn connect <country_code server_number> (eg. nordvpn connect uk715)
nordvpn disconnect or nordvpn d - Disconnect from VPN.
nordvpn connect US -g double_vpn - Connect to a Double VPN server where the first hop is a specific country
nordvpn connect P2P - connect to a P2P server.
nordvpn connect The_Americas - connect to servers located in the Americas.
nordvpn connect Dedicated_IP - connect to a Dedicated IP server.
nordvpn set or nordvpn s - Set a configuration option. Possible options:
nordvpn set cybersec on or off - Enable or disable CyberSec
nordvpn set killswitch on or off - Enable or disable Kill Switch
nordvpn set autoconnect on or off - Enable or disable auto-connect. You can set a specific server for automatic connection using nordvpn set autoconnect on country_code+server_number. Example: nordvpn set autoconnect on us2435.
nordvpn set notify on or off - Enable or disable notifications
nordvpn set dns 1.1.1.1 1.0.0.1 - Set custom DNS (you can set up a single DNS or two like shown in this command).
nordvpn set protocol udp or tcp - Switch between UDP and TCP protocols
nordvpn set obfuscate on or off - Enable or disable Obfuscated Servers.
nordvpn set technology - Set connection technology (OpenVPN or NordLynx)
nordvpn whitelist add port 22 - Add a rule to whitelist a specified incoming port. You can also whitelist multiple ports — just separate their numbers with a space.
nordvpn whitelist remove port 22 - Remove the rule to whitelist a specified port.
nordvpn whitelist add subnet 192.168.0.0/16 - Add a rule to whitelist a specified subnet.
nordvpn whitelist remove subnet 192.168.0.0/16 - Remove the rule to whitelist a specified subnet.
nordvpn account - See account information
nordvpn register - Register a new user account
nordvpn rate - Rate your last connection quality (1-5)
nordvpn settings - See the current settings.
nordvpn status - See the connection status.
nordvpn countries - See the country list.
nordvpn cities - See the city list.
nordvpn groups - See a list of available server groups.
nordvpn logout - Log out.
- nordvpn help or nordvpn h - See the list of available commands or help for a specific command.
You can get an extensive explanation of all commands by using the man nordvpn command in Terminal.
方法二
關閉 IPv6
sudo nano /etc/sysctl.conf在檔案尾端加入下列 4 行:
net.ipv6.conf.all.disable_ipv6 = 1
net.ipv6.conf.default.disable_ipv6 = 1
net.ipv6.conf.lo.disable_ipv6 = 1
net.ipv6.conf.tun0.disable_ipv6 = 1存檔,重啟。
從 Linux Network Manager 連上 NordVPN Servers
下載 OpenVPN Configuration File Package (ovpn.zip),並解壓縮
從螢幕右上角點開網路設定,下拉 VPN OFF 選擇 VPN Setting
按下 VPN 旁 + 號,新增 VPN

選擇連線類型 Import from file…
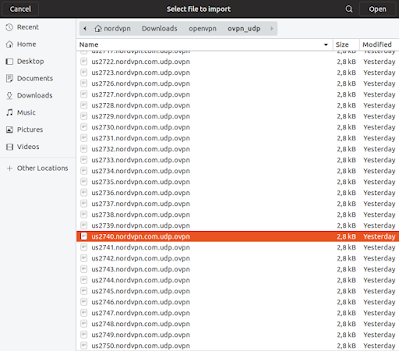
從步驟 1 解壓縮產生之 ovpn_udp 夾中,開啟一個組態檔或參考方法三,使用推薦伺服器的組態檔。
在跳出的視窗中輸入帳密,按下 ADD 新增
在 Linux Network Manager 畫面 VPN 項下,按下撥動開關,當它呈現綠色,就完成 VPN 連線工作
方法三
從 NordVPN 網站「推薦伺服器」功能連上 NordVPN Servers
點選「推薦伺服器」
點選「Show available protocols」
點選「OpenVPN UDP」右側「Download config」
- 承接方法二:步驟 6 加入 VPN 即可


